Showing posts with label tutorials. Show all posts

5.23.2013

diy//desert terrarium 101


This is a fun and super easy project for your kiddos to do.  Carter needed to make a terrarium for scouts and I was missing the Arizona desert, so this project satisfied both of our needs.  I let Carter do most of the work, only stepping in to help keep the soil from going all over the place.  We put the terrarium together in our living room because the best natural light is in that room of our home and I needed good light for picture taking.

As for the materials, we were able to purchase the succulents and cactus soil in the garden section at Lowes.  You need cactus soil for succulents because it drains well.  I picked up the white rocks at PetSmart where the fish supplies are sold.  They have several colors to choose from.  I went with the white rocks because they go best with our home decor.  The fish bowl was less than $4 from Michaels. I am loving the way this terrarium turned out and hope my brown gardening thumb doesn't kill it ;)

2.13.2013

classroom valentines

I have 4 kids, three of which are in elementary school.  And you know what that means - parties.  Valentines Day typically falls into the most expensive school party category because the kids are asked to bring a special something for each person in their class.  This year, I was determined to make homemade valentines instead of store bought cards the kids have insisted on buying in the past.  Who's in charge here anyway?  I also wanted to keep the expense to a minimum.  I scoured pinterest and google and came up with two great options - one for boys and one for girls.

The first valentine uses glow sticks.  I bought two tubes, 15 sticks in each.  And each package was only $1.  Cheap, I tell ya ;)  The easiest way to insert a stick is to use a blade (I used a box cutter) to make an upside down T right at the top of the metal part of the light saber on the picture.  After inserting the glow stick about half way, add a plastic connecter to the hidden end of it.  Be careful when doing this that you don't "break" the stick - otherwise it will use up all its light before it even makes it to the classroom.  Finally, tape it down.  That's it!


I wanted something more girly for the girls and found some cute bubbles with hearts on top in the wedding section of Michaels.  There are 30 in the box and that was enough to give each girl in all 3 of my kid's classes one each and still have a few left over.  I googled something like "free valentine bubble printable" and found a cute and simple tag to attach to each heart on the top of the bubbles with some yarn from my stash.  To make a hole for the yarn to go through, I used my Martha Stewart heart punch.  I use my heart punch on a regular basis - probably more than a regular hole punch.  There I said it.   I am a heart punch addict ;)


These were so quick and easy to make.  From start to finish, it took me about 3 hours - and that includes the time I spent at Michaels to buy supplies.  My grand total was just $11.54 for the bubbles and glow sticks.  Not bad for having to make about 60 valentines!  Then rest of the supplies I already had on hand (cardstock, yarn, scissors, heart punch, paper trimmer, box cutter).  I am hooked on homemade valentines.  Are you? I'd love to see what you made this year!  Leave a link in the comments below.

Sources: Star Wars Valentine and Bubbles Valentine

2.09.2013

home decor//mixed frames

I'm sneaking in a little bit of blogging today (my weekend schedule is CRAZY).  Sigh.  All I want to do is plop down on the couch and watch a long movie like Steel Magnolias and eat chocolate chip cookies.  Instead I am running the kiddos all over and I have yet to see my hubby today.  A bright spot??  Carter won his basketball game today.  Boo that I missed it to get Tatum to a birthday party across town but I am so proud of him and the Mr. who is coaching this year.

On to today's post......I wanted to share another simple way to add some pictures to your walls.  Every time I go to thrift stores, I head right for the frames section.   In a handful of trips, I found four frames that had enough decoration to make them visually interesting.  They are each a different size so in order to make them look cohesive, I spray painted them a glossy white.  To break up all the white, I added a black letter B and a black plaque to the mix.   Before hanging them, I laid the frames out on the floor and moved them around until I came up with an arrangement I liked.  Then I adhered 3M strips to the backs of them and hung the center frames first, working my way out from there.


 I filled the frames with simple prints.  Here are my sources:


Center Frame: Chalkboard printable

Letter B
Michaels

No 3 print

Families Are Forever Plaque
LDS bookstore – Mesa

Love At Home print
made by me using PSE10

Be Strong & Of Good Courage

Do you have grouped frames on your wall?  I'd love to see!  Share a link in the comments below.

11.05.2012

DIY//pom pom garland


My front window needed a little sprucing up for this Thanksgiving month, so I put my yarn stash to good use and made a pom pom garland.  Here's the how-to:

1.  Gather supplies: yarn of choice & scissors


2.  Cut one long piece of string (about 10 inches long) and set aside.  You will need this later.
3.  Hold up three fingers vertically and wrap yarn over the top two fingers and then behind the bottom (third) finger.


4.  Holding fingers slightly apart, begin wrapping yarn around all three fingers.  If you wrap too tight, the yarn will cut off your circulation.  I go around with the yarn about 80 times.


5.  Carefully slide the yarn off your fingers, being careful to keep the shape of the yarn, and set it on top of the piece of string you cut in step #2.


6.  Tie the string around the center of the yarn and pull it as tight as you can when making your knot.


7.  Trim the ends of the string and then being cutting the loops in half.  There are layers of loops, so be sure to trim a little at a time (starting on the outer layer first) until all the layers have been cut and it looks somewhat like a ball.

8.  Very carefully, fluff the yarn ball with your fingers and then trim any edges that look too long.


9.  Tie each pom pom to a string and hang up where everyone can see it :)


I hope you enjoyed this little tutorial and that your Monday has been lovely.
Tomorrow is voting day.  Eeep!

xo,
--Anna
PS - Did you make some pom poms? I wanna see! Share a link in the comments.

10.18.2012

DIY//no sew chevron curtains

The kids  woke up to new curtains in the living room and boy were they excited!  It was kinda cute (and somewhat flattering) to watch them gush over them.


Chevron is my favorite pattern of all time.  I loved it when I was five, doodled it all over the margins of my papers in junior high and my heart still goes pitter-pat whenever I see it.  My second favorite pattern?  Houndstooth - just in case you're wondering' ;)

When we moved into our little brick rental home, boring brown curtains were hanging in the living room.  They were definitely not our style.  So I decided chevron curtains were a must and began hunting for some online.  Our front window requires four panels and after doing a little research, I realized they were just too pricey.  So I opted to make my own.  I purchased a roll of black and white zig zag print from fabric.com and got to work cutting pieces long enough to cover the window, but not hang down to the floor (we have floor heaters that are at the base of the wall and I wanted to avoid those pesky things).


I don't have a good spot for my sewing machine just yet so I decided to use Heat-n-Bond no sew iron-on adhesive.  Just look for HEM on the package.  I bought two small packages of it, using the thicker rolls of adhesive for the curtains and will use the thinner rolls for future projects.  I am so pleased with the results!


The tricky part to making curtains that have such a bold pattern is that you need to sew (or use adhesive & iron like I did) each curtain exactly like the one before.  The pattern on each curtain should line up with the one next to it so your pattern can continue.  It is especially noticeable at the top and bottom of your curtains.  So measure carefully and sew even more carefully!  I purchased four packages of black ring clips from Target and the Mr. graciously helped me hang them.  The best part is that I am pretty sure he likes them even more than I do.  He's definitely a keeper.


Do you have chevron curtains?  I'd love to see - please share a link in the comments!

--Anna
PS - I spaced it and didn't turn on the light in the living room to take the pictures so I hope all is well and you can still see the curtains enough to get a good idea of what they look like.

11.25.2011

turkey day place cards

I know Thanksgiving is officially over and it seems kind of silly to share a turkey day craft tutorial with you, but I got to thinking that it might come in handy for Christmas.  I'm all about the sharing, you know (wink, wink).  


You'll need the following supplies to make these:
1. cream colored card stock
2.  fall-themed stamp & inkpad
3.  black pen (I like Micron pens)
4.  pinecone

Cut your card stock into squares, stamp them & add someone's name.  Or you can add just the first initial of your guest to the card like I did.  These are so easy, your kids can do them.  It will keep them busy while you make your fancy dinner.  Or you can whip them up yourself in 10 minutes flat.  What's not to like about that?

I hope you all had a lovely Thanksgiving holiday with loved ones and that you are safe & well.

xo,
--Anna

11.07.2011

Make It Monday: dress re-do

Hello friends :)

After my last post, I feel like I am on track with a lot of things & ready to share a not-such-a-downer post, ha!  So today, I will be sharing a dress re-do for a sweet little number I picked up for Tot at a local thrift shop for a buck.  Not too shabby, eh?  It is the perfect floral pattern for fall & summer, can be worn with or without tights/leggings, and is long enough that it will last her a couple seasons before she grows out of it.

  Let's get started.


The straps on the dress were much too big.  The sewing job on the front was not well done so I ripped the seams on the front and left the back of the straps in place.  I had her try on the dress so I could pin the straps exactly the right length before sewing them in place.


I didn't cut off the excess - just in case she has some crazy growth spurt and the straps need to be lengthened.  We just tucked them behind the bodice of the dress and they stay hidden perfectly.


The skirt of the dress was much too long - down to her feet.  I wanted something that would fall just below her knee, allowing her room to grow.  While she was trying on the dress, I placed a pin at the length I wanted the skirt.  Then I laid the skirt out flat and cut it straight across.  You can use a ruler if you like but I just eyeballed it.  

Then I folded the end in 1/4 inch and folded it in again, pinning in place as I went.  Then I sewed a straight stitch at the top of the hem and the bottom.  I wish I had a serger.  But for this project, a straight stitch will do.


It only took me an hour to complete this little project - and that includes taking time to help with math homework & make dinner.  Mothers are fabulous multi-taskers.  And now Tot has a cute little dress.


Happy Monday.

xo,
--Anna


10.16.2011

Make It Monday: kitchen cupboard makeover

Hello there.  I am excited to share today's tutorial with you - because it means I FINALLY have something in my cabinets besides empty spaces.  See, when we remodeled our kitchen, our cabinet guy said it would be much cheaper to take the cabinets to a glass store & have them put in the glass than to order them with the glass already installed.  Well after the kitchen re-do was done, we were out of money & so the glass in the cabinets would have to wait.  And wait.  And wait.  

Fast forward about 2 years (the present time) and we have to put our house on the market because the Mr. got a new job (eek!).  We knew we had to fill those cabinets with something and that it had to be cheaper than glass.  We found decorative metal sheets at The Home Depot (in the wood section) and knew we had found our solution.

So let me tell you how to liven up your kitchen cabinets in a super cute way.  First, you will need metal cutters, a measuring tape, a decorative metal sheet from a hardware store, some flat push pins (not pictured below) & a black sharpie.


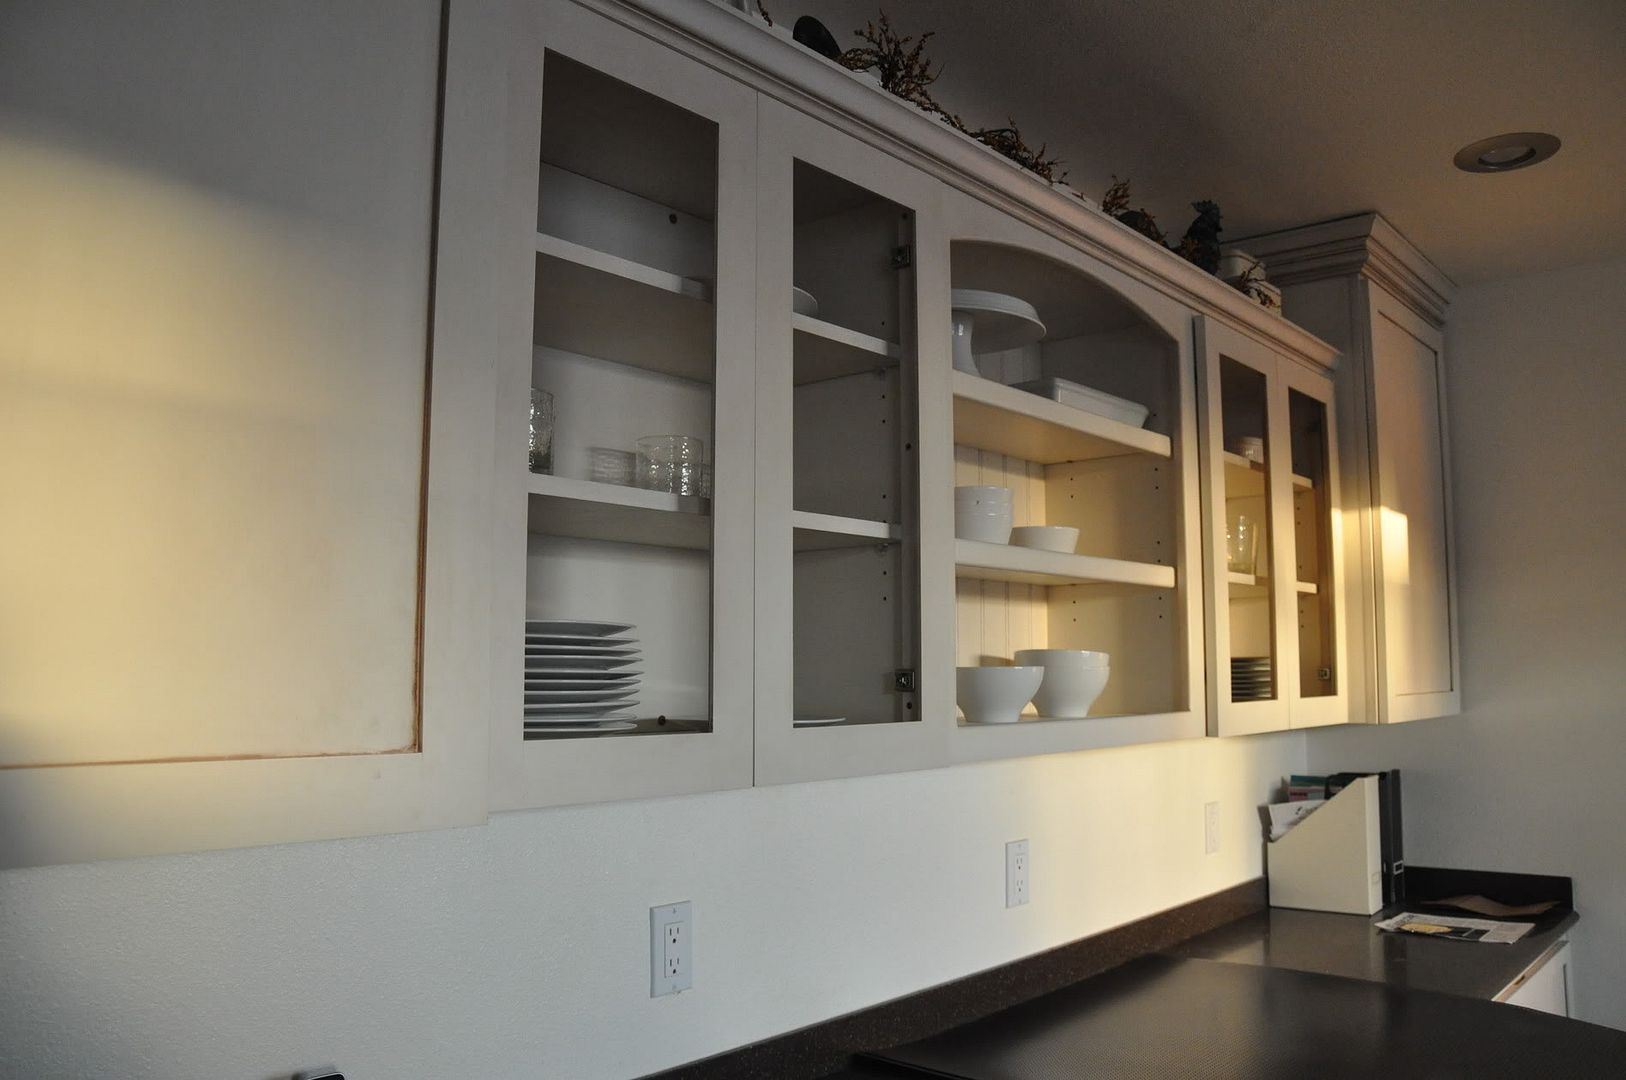
So here is what our cabinets looked like before.  Sad, I know.


See why they needed prettied up?  It was super easy.  I just measured the cabinets with my measuring tape & then drew those same measurements onto the metal sheet using the sharpie.  If you want to make your lines super straight, use a t-square or a flat ruler.  Cut the metal and insert it into the back of the cabinet.  It might be necessary to trim a little here & there to get a good fit.  To make sure it stays, push a pin into each corner at an angle.  If you want to make them more permanent, you could always glue them in.  That's it folks.  You're done!

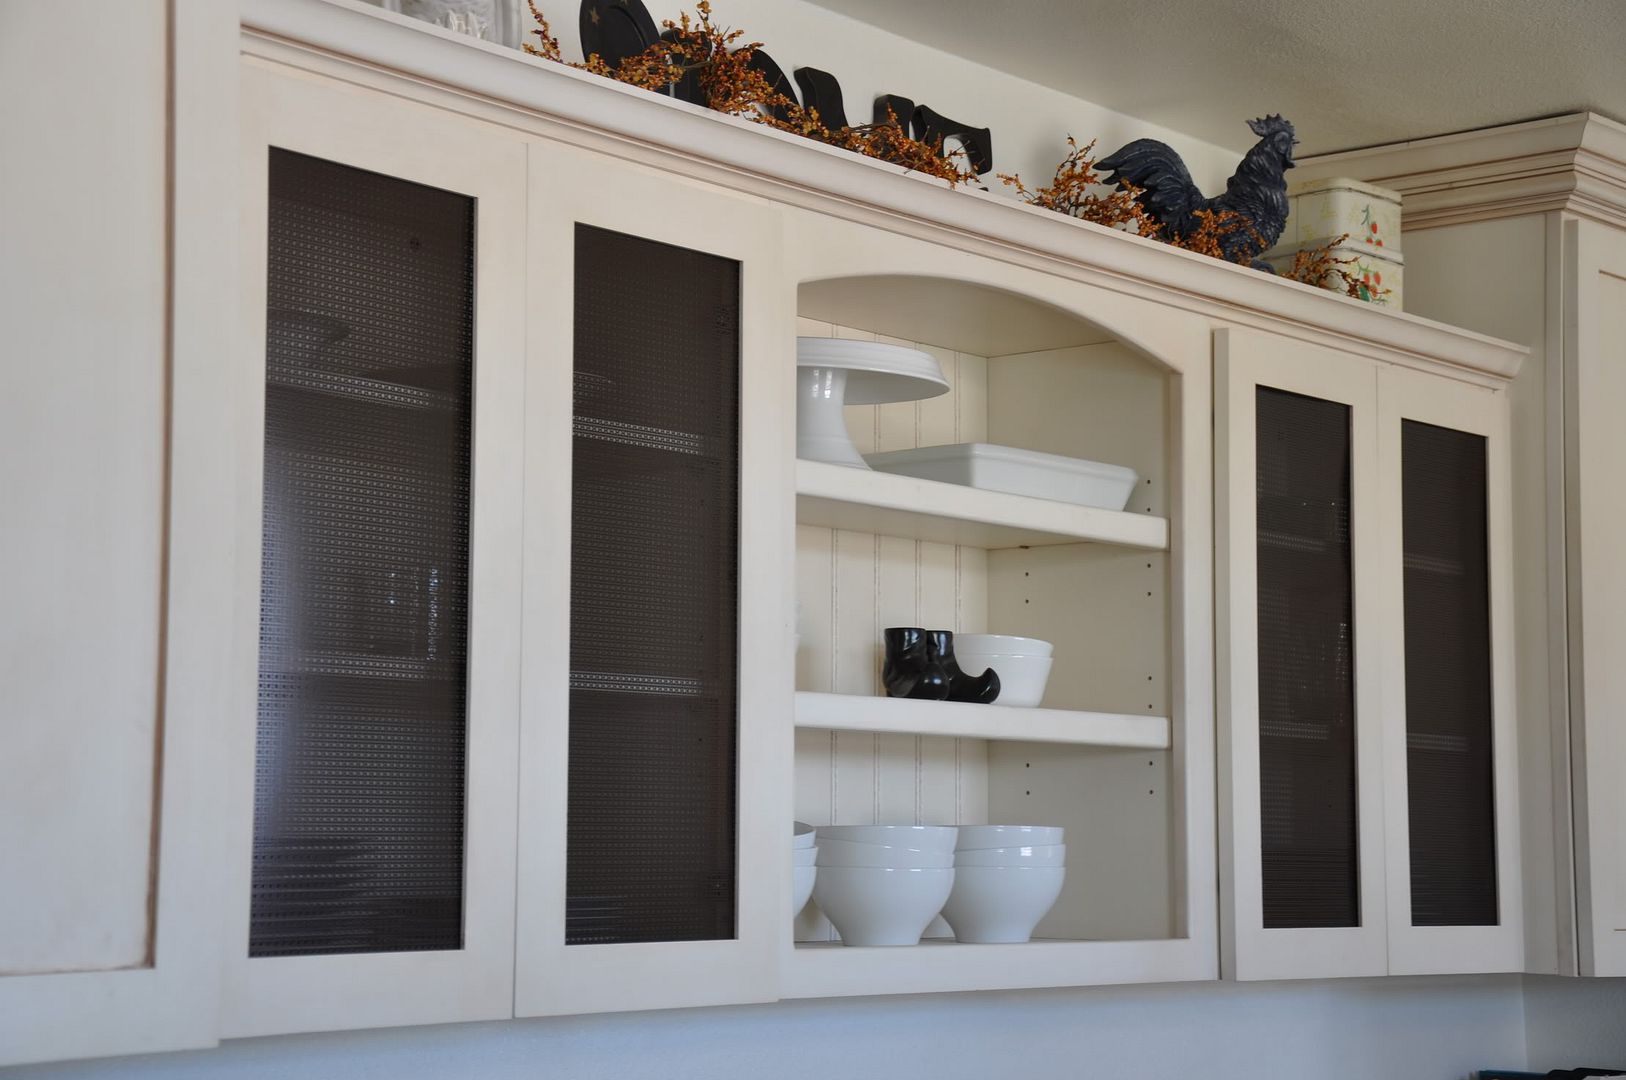
Now look at how fancy schmancy our cabinets are:


Obviously, I decorated for Halloween/Fall in-between the before and after photos.  But seriously, isn't this cute?  We are definitely doing this in our next house.  Not only is it easy, you'll end up with cabinets that no one else you know has.  And they'll think your cabinets are super cool.  And who wouldn't want that?

Happy Monday,
--Anna

10.03.2011

Make It Monday: old jeans//new jeans

I have a pair of Sweetheart blue jeans from Old Navy that I love.  I love the fit, that is.  Not the color.


So I decided they needed some freshening up.   Denim Blue RIT dye from Walmart would be just the thing to deepen that faded old blue.  


I decided the best place to do this project was in my kitchen sink because it is big & deep (and I wouldn't have to be hunched over the whole time).  The packaging does say that it will stain cracks in porcelain (the material my sink is made of) so I was sure to wash any stain down immediately.  

I filled up a bucket about half full with water that was as hot as I could stand to touch.  I poured in the whole container of dye while the water was running and poured in a cup of salt (per the container's directions).  Hot water and salt allow the fibers to expand and the color to set better.  The dye also says to stir your project with a wooden spoon.  I don't have one.  And since my jeans are a larger project, I donned a pair of rubber gloves and swished the jeans around in the bucket the entire time.


I left the jeans in the dye bath for 35 minutes.  It took me an equal amount of time to rinse out all the dye before throwing the jeans into the washing machine.  Be sure to rinse with cold water as this will allow the fibers to shrink and the color to set.  Some dyes take longer to rinse out than others.  Reds usually take the longest.

And now my blue jeans are a blue I love.  


This project made me miss the process of fabric manipulation - something I did in college.  I really want to do more and am already searching my closet for more dying possibilities.    A project like this is lots of fun, easy to do and can bring a completely new life to something rather drab.    So go dye something - you'll be glad you did.

Have a lovely day,
--Anna